
Table of Contents
- What You'll Need Before Framing Your Diamond Painting
- How to Prepare Your Canvas for Framing
- How to Seal Diamond Painting Before Framing
- Stretcher Bars for Diamond Painting: Installation and Alignment
- Diamond Painting Frame Ideas and Mounting Techniques
- Custom Framing Diamond Art: Professional Matting and Preservation
- Common Mistakes When Framing Diamond Painting Artwork
- Conclusion: Display Your Finished Diamond Painting with Confidence
Last Updated: July 28, 2026
How to frame diamond painting artwork requires careful preparation, precise mounting techniques, and thoughtful preservation strategies to ensure your finished masterpiece stays beautiful for years. At Jeanne Argent Atelier, we understand that completing a diamond painting is only half the journey, proper framing protects your work and showcases it with the polish it deserves. Below, we'll walk you through every step of how to frame diamond painting artwork, from preparing your canvas to selecting the right mounting method for your specific project.
The difference between a diamond painting that looks polished and one that looks amateur often comes down to framing. A properly framed piece looks professional, protected, and ready to hang with confidence.
What You'll Need Before Framing Your Diamond Painting
Gathering the right materials before you start makes the entire framing process smoother. Start with stretcher bars, wooden frames that form the foundation of your display. You'll also need acid-free backing board to support the canvas from behind, double-sided tape or canvas adhesive to keep it secure, a utility knife for trimming excess border, and optionally a sealant spray to protect the drills.
| Material | Purpose | Notes |
|---|---|---|
| Stretcher bars | Foundation frame | Match canvas dimensions exactly |
| Acid-free backing board | Structural support | Prevents deterioration over time |
| Double-sided tape or adhesive | Canvas mounting | Choose museum-quality for preservation |
| Utility knife | Trimming borders | Sharp blade prevents fraying |
| Sealant spray | Drill protection | Optional but recommended |
| Glass or acrylic | Surface protection | UV-filtering preferred |
| Hanging hardware | Wall mounting | Rated for your canvas weight |
Measure twice before purchasing materials. A common mistake is buying stretcher bars one size too small or backing board that's slightly off-dimension. Take exact measurements of your finished canvas after trimming excess border, as this determines everything else.
How to Prepare Your Canvas for Framing
Before touching any mounting materials, your canvas needs inspection and light preparation. Lay your canvas flat on a clean surface and look across it at an angle to catch any drills that appear loose. Use a small amount of adhesive on a toothpick to secure any loose drills, then let dry completely before proceeding.
Checking for air bubbles and loose drills
Air bubbles trapped under the diamond coating create visible defects and can trap moisture. Run your hand gently across the canvas surface, pressing lightly. Any soft spots indicate trapped air that needs addressing before framing.
For minor air bubbles, use a rolling tool or the back of a spoon to gently press the bubble toward the nearest edge. Work slowly, as aggressive pressure can crack drills or shift them out of alignment. Loose drills will have a slight rattle when you gently shake the canvas. Mark these locations and secure each one with minimal adhesive.
Trimming excess border carefully
Most diamond painting canvases include a border of blank canvas beyond the design. Measure the excess border on all sides and leave a quarter-inch of blank canvas as a margin around the diamond design. This margin gets hidden behind the stretcher bars and provides a clean edge.
Use a sharp utility knife and a straight edge to cut the border in one smooth pass rather than sawing back and forth. After trimming, inspect the edge carefully and seal any loose threads with a small amount of clear adhesive to prevent unraveling.
How to Seal Diamond Painting Before Framing
Sealing your diamond painting creates a protective barrier against dust, moisture, and UV damage. A clear acrylic spray sealant works best. Apply it in a well-ventilated area, holding the can 8-10 inches from the canvas surface, using light, even passes rather than one heavy coat. Multiple thin coats provide better protection than a single thick coat. Allow each coat to dry completely, typically 15-20 minutes, before applying the next.
The sealant binds the drills together slightly, preventing them from shifting or coming loose over time, and creates a dust-resistant surface that's easier to clean. Quality acrylic sealants designed for crafts maintain the clarity and shine of your drills. Allow the sealed canvas to cure for at least 24 hours before mounting.
Stretcher Bars for Diamond Painting: Installation and Alignment
Stretcher bars form the skeleton of your framed diamond painting. Getting this step right is crucial because misalignment creates visible wrinkles and uneven tension across the canvas.
Choosing the right stretcher bar size
Stretcher bars must match your canvas dimensions exactly after trimming excess border. Standard sizes like 8x10, 11x14, 16x20, and 20x24 inches are available at craft stores. If your canvas is an odd size, you can purchase individual bars and assemble them, or have custom bars cut at a framing shop.
Standard bars are three-quarter inch thick, which provides good structural support. Thicker bars (one inch) work better for very large canvases over 20 inches in any dimension, as they prevent sagging.
Securing the canvas to the backing board
Cut your backing board to the exact same dimensions as your trimmed canvas. Position the canvas on the backing board and align all edges carefully. Apply double-sided tape or canvas adhesive in a grid pattern, one strip along each edge and two or three strips across the middle. This prevents air pockets and ensures even tension.
Press the canvas firmly onto the backing board, working from the center outward. Allow the adhesive to set according to product instructions, typically 24 hours for maximum strength.
Position this assembly onto the stretcher bars, with the stretcher bars sitting behind the backing board. Secure the canvas to the stretcher bars using staples or canvas tacks placed every 2-3 inches around the perimeter. Start at the center of each side and work toward the corners to maintain even tension. Pull the canvas taut as you staple, but not so tight that you deform the stretcher bars or create wrinkles.
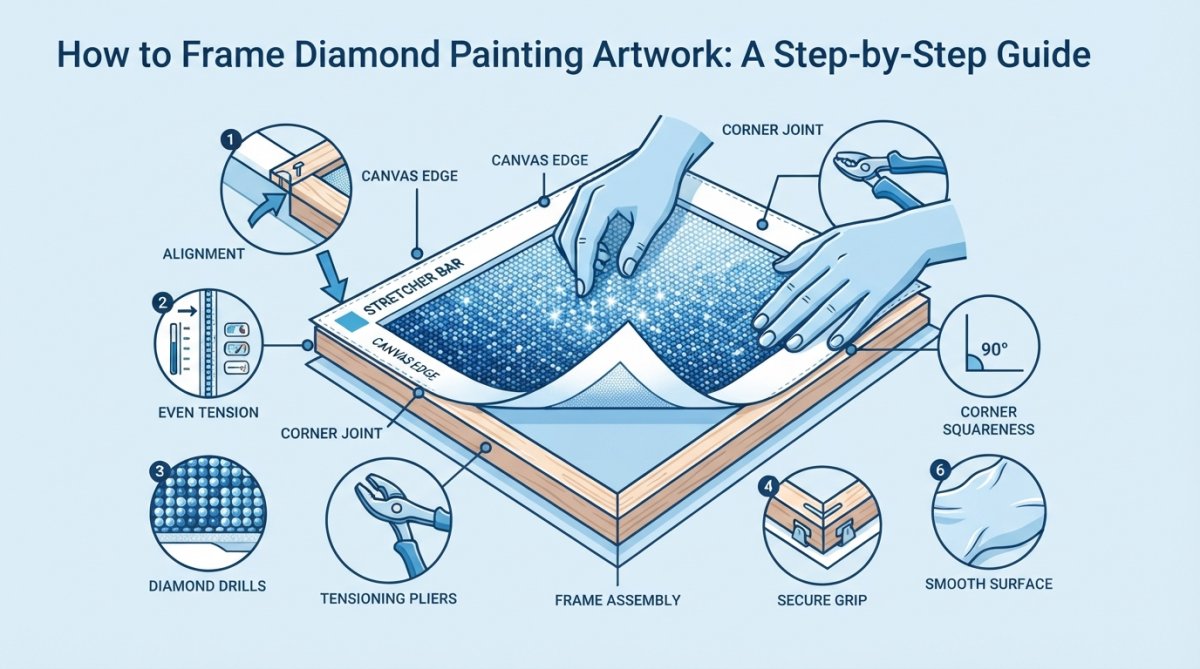
Check your work by looking at the canvas from an angle. Any visible wrinkles or slack areas indicate uneven tension. Adjust by removing staples and re-securing with better tension.
Diamond Painting Frame Ideas and Mounting Techniques
Once your canvas is mounted on stretcher bars, you have several options for displaying it.
Glass vs. no-glass framing for finished projects
Glass provides superior optical clarity and doesn't yellow over time like acrylic can. However, glass adds significant weight and creates reflection in bright lighting, which can obscure the view of your drills.
No-glass framing is lighter, cheaper, and shows off the full sparkle of your drills without reflection. The trade-off is that the surface is exposed to dust and potential damage. A sealed canvas is more resistant to dust and moisture, making no-glass display more practical.
UV-filtering acrylic is a middle-ground option that protects against sun damage while remaining lighter and cheaper than glass.
Using double-sided tape and adhesive methods
Double-sided tape is the preferred method for securing canvas to backing board because it's reversible. Conservation-grade archival tape is better for pieces you want to preserve long-term.
Apply the tape in parallel strips running the width of the backing board, spaced 3-4 inches apart. Press the canvas firmly onto the tape, working from the center outward to avoid air bubbles. For added security on large canvases, use both tape and a thin line of canvas adhesive around the perimeter. Use adhesive sparingly, a thin bead is sufficient.
Custom Framing Diamond Art: Professional Matting and Preservation
For serious artists or high-value pieces, professional matting and preservation techniques take your framed diamond painting to gallery quality.
Long-term preservation and UV protection
Diamond paintings are vulnerable to UV fading, moisture damage, and physical deterioration of the canvas. UV-filtering acrylic or glass blocks most harmful rays. Alternatively, position your canvas away from direct sunlight or use window treatments to filter UV light.
Store or display your framed painting in a climate-controlled environment, ideally between 40-60% relative humidity and 65-75°F. Avoid basements, attics, and bathrooms where humidity fluctuates dramatically.
Acid-free materials throughout the framing process prevent chemical deterioration. Cheap backing board contains acid that migrates through the canvas over decades, weakening fibers and yellowing the work. Invest in acid-free foam board and archival tape. Professional framers use conservation-grade materials specifically designed for long-term preservation.
Weight management for large-format paintings
Large diamond paintings present weight challenges that require careful planning. A fully drilled 20x24 inch sealed diamond painting can weigh 8-12 pounds. This requires heavy-duty hanging hardware rated for that weight.
Use a wall stud finder to locate wall studs and anchor your hanging hardware into studs whenever possible. Heavy-duty picture hooks rated for 20+ pounds are available at hardware stores. For very large canvases over 24 inches in any dimension, consider distributing the weight across two or three hanging points rather than a single center point.
If weight is a concern, use acrylic instead of glass, or display the canvas without any protective covering.
Common Mistakes When Framing Diamond Painting Artwork
The most common mistake is trimming too much border. Artists get eager to remove all excess canvas and end up cutting into the margin needed for secure mounting. Measure carefully and cut conservatively.
Another frequent error is mounting the canvas with uneven tension, which creates visible wrinkles that are difficult to fix after the fact. Take time to ensure the canvas is taut and evenly tensioned across the entire surface.
Skipping the sealing step is a missed opportunity for protection. Sealing takes an hour and provides years of protection. Using non-archival materials is another common oversight, cheap backing board, acidic tape, and regular adhesive cause deterioration over years.
Choosing inappropriate hanging hardware for the canvas weight is a safety issue. Check the weight of your finished piece and use hardware rated for that weight plus a safety margin. Displaying the canvas in direct sunlight without UV protection fades colors and yellows the canvas.
Conclusion: Display Your Finished Diamond Painting with Confidence
Framing your completed diamond painting properly is the final step that transforms your work from a project into a finished piece of art. Whether you're displaying a small 8x10 canvas or a large 20x24 masterpiece, the techniques covered here ensure your work stays beautiful and protected.
Jeanne Argent Atelier understands that completing a premium full-drill diamond painting represents significant time and artistic effort. Use acid-free materials throughout, seal your canvas for protection, and choose mounting techniques that distribute tension evenly. These decisions cost slightly more upfront but prevent deterioration and preserve the clarity and sparkle of your drills for years to come.
Ready to complete your diamond painting journey? Explore premium full-drill diamond painting kits from Jeanne Argent Atelier and discover how quality materials from the start make every step, including framing, easier and more rewarding.
Frequently Asked Questions
Should you seal a diamond painting before framing?
Yes, sealing your diamond painting before framing is highly recommended. A quality sealer protects the drills from dust, moisture, and accidental contact, ensuring your finished project maintains its brilliance and adhesion long-term. Apply sealer in thin, even coats and allow complete drying before mounting on stretcher bars or into a frame. This step is especially important if your canvas will be displayed in high-traffic areas or homes with pets.
Do you put glass over a diamond painting when framing?
Glass over diamond paintings is a personal choice. Glass offers UV protection and dust prevention, preserving the drills' sparkle longer. However, glass can create glare and may diminish the three-dimensional sparkle effect that makes diamond paintings special. Many crafters prefer frameless displays using stretcher bars or wooden sign boards to showcase the dimensional quality. If you choose glass, ensure it's acid-free and UV-protective to prevent long-term damage to your artwork.
What's the best way to frame a diamond painting without a frame?
Frameless framing uses stretcher bars or wooden backing boards to display your finished project. Secure your trimmed canvas to stretcher bars using double-sided tape or adhesive, ensuring proper alignment. Alternatively, mount your canvas on a mini pallet frame or wooden sign board for rustic home decor appeal. This method eliminates glass glare, showcases the drills' sparkle, and works well for custom framing diamond art. Add hanging hardware to the backing for wall display.
How do you prepare a diamond painting for framing?
Preparation involves checking for air bubbles and loose drills, then trimming excess border from the canvas. Inspect the entire finished project under good lighting, pressing down any lifted areas. Trim excess edges carefully with sharp scissors, leaving a small border for mounting. If using stretcher bars, ensure your frame size matches your canvas dimensions. For professional results, seal the canvas before mounting, then secure it to the backing board using acid-free adhesive or double-sided tape for long-term preservation.
This article was written using GrandRanker